
I write many blog posts, and for years they were just text. That works for readers who like to read, but plenty of my audience is busy. They’d rather listen while commuting or cooking. So I set up an article to audio workflow for every post, and I did it without paying for a voice service or sending my words to anyone else’s server.
Here is exactly how I do it, the tools I use, what each one does, and the mistakes to avoid so your first audio file sounds better than my first one.
The short answer: write the post, ask Claude to turn it into a script that sounds right when spoken, generate the voice offline in Speech Note using Kokoro or Piper, host the file on RSS.com, and embed the player at the top of the post in WordPress. It costs nothing in software and about twenty minutes per post.
Want help setting up AI tools that actually do the work in your business?
If you want help setting up an offline voice workflow or other AI tools for your own blog or business, I am happy to talk it through.
Email me Know more about meWhy bother with article to audio conversion?
A blog post takes five to ten minutes to read. Not everyone has those minutes with a screen in front of them. An audio version lets the same post reach people who would otherwise skip it, such as someone driving, walking, or cooking.
It also helps people who simply prefer listening, and anyone who finds long text on a screen tiring. Plus, it makes the site feel more complete because a small player at the top tells visitors they can choose how to take in the content.
There’s a practical benefit for me as well. The written post stays exactly as it is, with all of its search value, and the audio is an extra on top. I’m not replacing anything; I’m just adding another way in.
The tools I use and what each one does
Claude is where the writing starts. I use it to help draft and tidy the post, then to prepare a listening version of the text. That second job matters more than people expect. A post written for reading doesn’t always sound right out loud. Claude helps me spell out abbreviations, drop code blocks and long URLs, and smooth any sentence that’s awkward to say. Without this step, the audio stumbles on exactly the parts that look fine on the page.
Speech Note is the app that actually creates the audio. It runs on my Fedora laptop and works offline. So the text never leaves my machine. I paste the cleaned script in, pick a voice, and export the file. It’s a free, open source app, which suits how I like to work. I prefer tools I can control and that don’t lock me in.
Kokoro and Piper are the voice engines inside Speech Note. Kokoro gives a more natural sound, while Piper is lighter and faster. I choose them for a practical reason as well. Kokoro is released under the Apache 2.0 licence and Piper under the MIT licence, which means audio made with them is safe to publish online. Some other voice models carry research or non-commercial terms, and I don’t want to find that out after a post goes live.
RSS.com hosts the finished audio files and gives me a player I can embed. Hosting the files yourself works too, but a podcast host provides an RSS feed so the same audio can show up in podcast apps with no extra effort. The plan I use is completely free.
WordPress is where it all comes together. I paste the embed code at the top of the post, and readers get a play button before they read a word.
My article to audio workflow, step by step
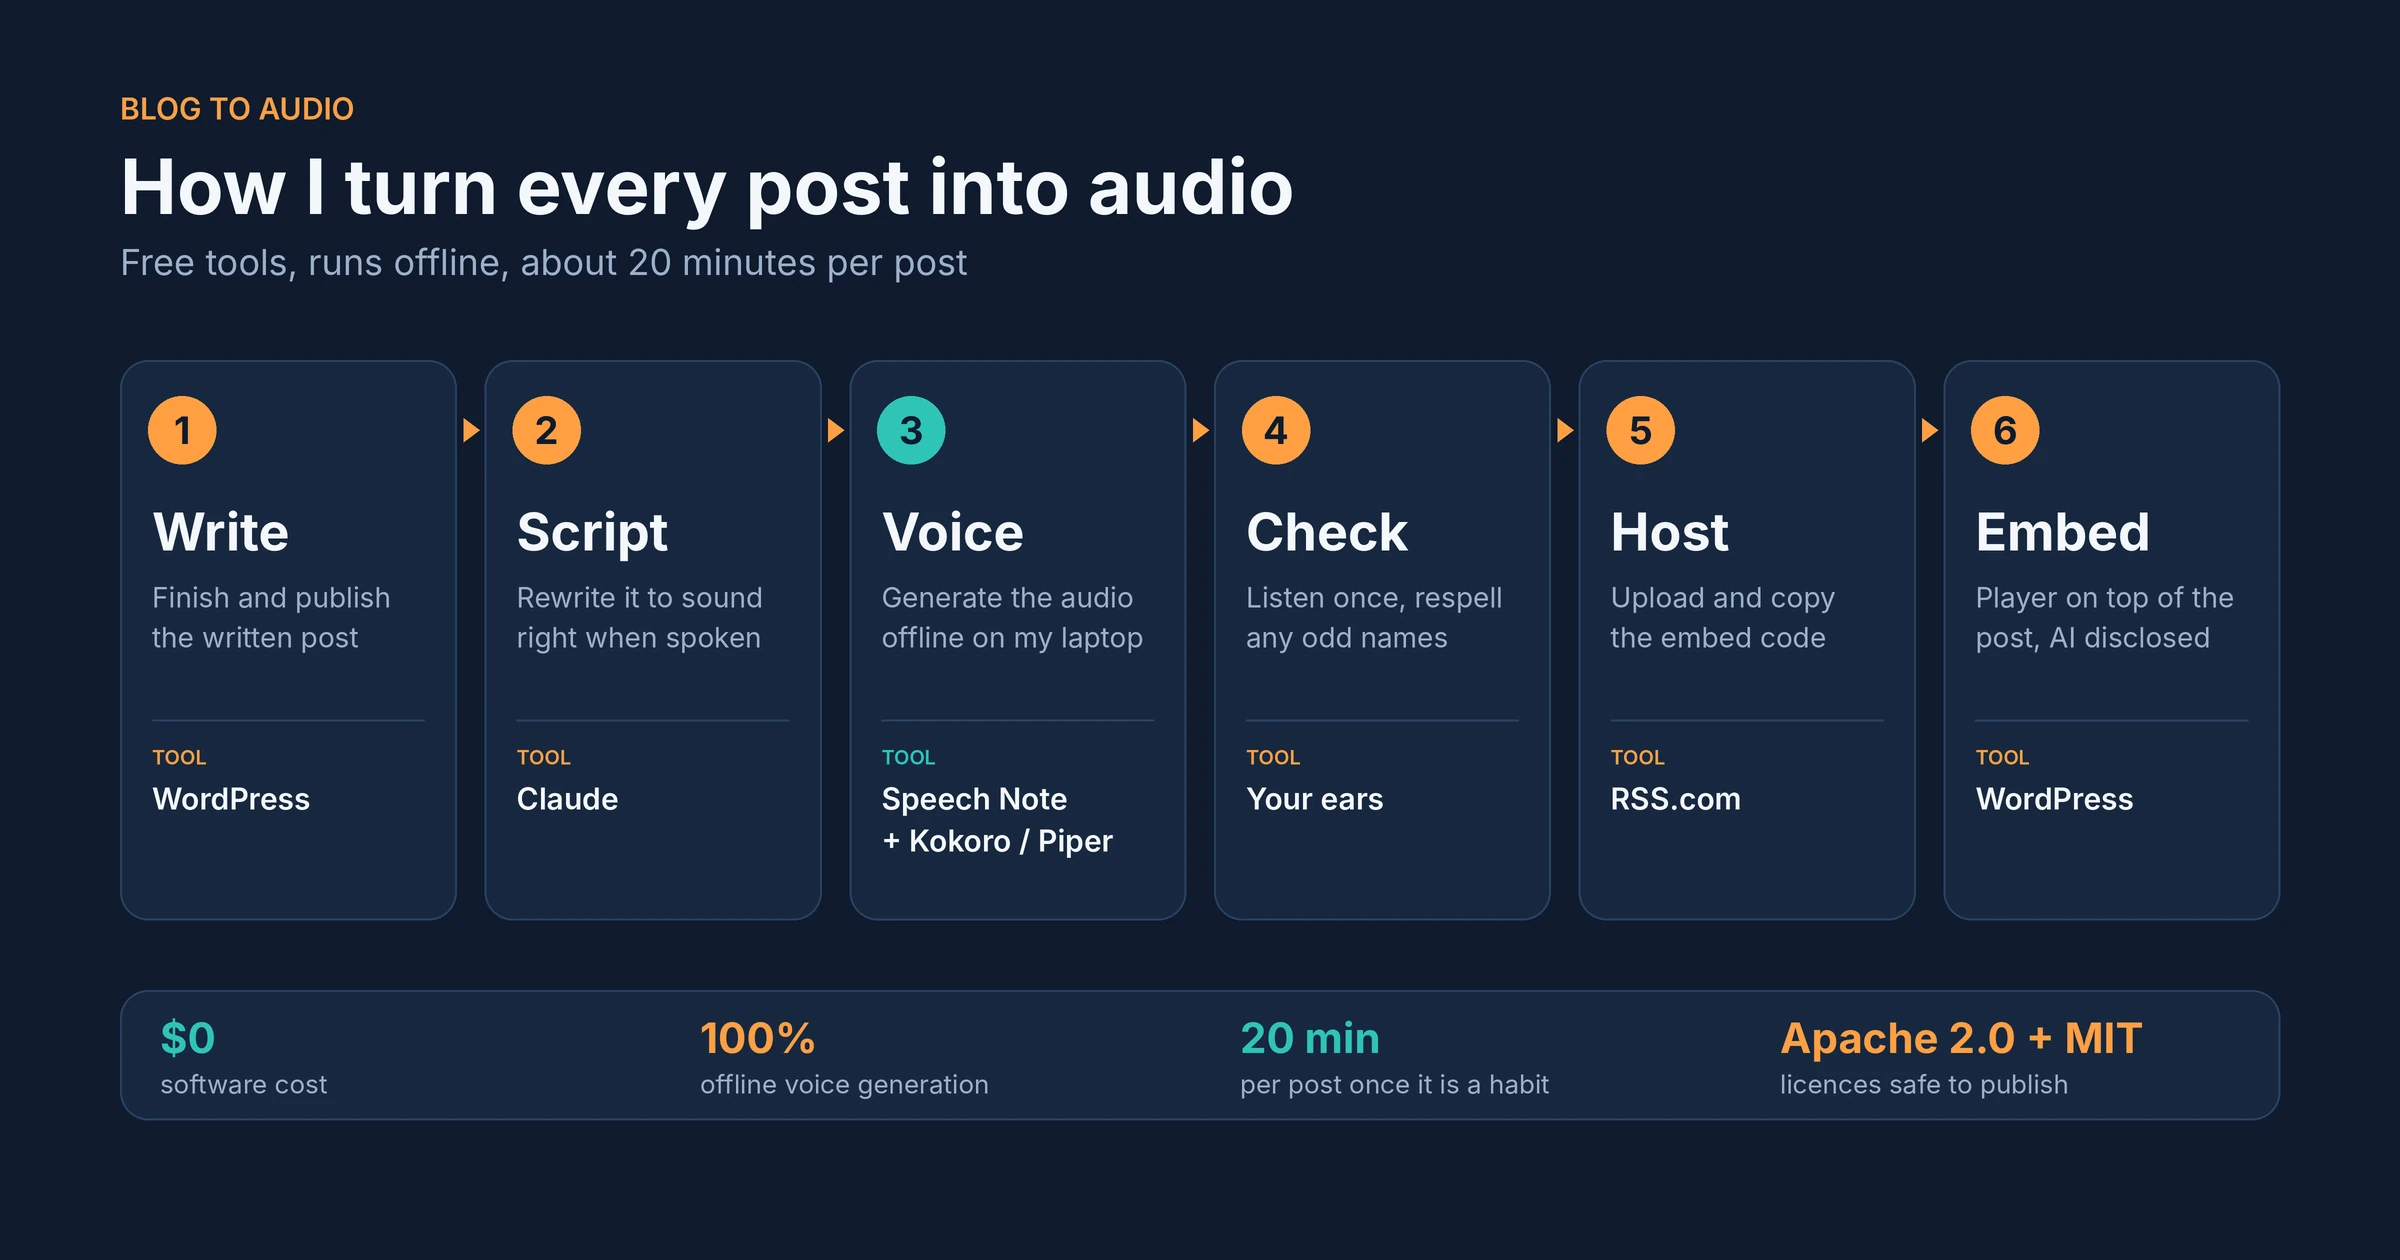
Step 1: Finish and publish the written post
I always publish the text version first. The written post is the main product, so it should be finished, edited, and live before I think about audio. That also means I never rush the audio and never end up with a recording that doesn’t match the final wording.
Step 2: Turn the post into a listening script with Claude
I copy the final text into Claude and ask it to rewrite it for the ear. A prompt along these lines works well:
Rewrite this blog post as a script to be read aloud. Keep my wording and meaning. Spell out abbreviations and numbers the way they are spoken. Remove code blocks, tables and links, and describe them in a short sentence if they matter. Break up long sentences. Do not add anything new.The last line is important. Without it, an AI tends to add its own introductions and summaries, and then the audio no longer matches the post. I read the script once before moving on to make sure my meaning survived.
Three things usually need fixing for audio:
- Abbreviations. Written out as letters or spelled in full so the voice doesn’t try to pronounce them as a word.
- Anything visual. Tables, bullet-heavy sections, and code don’t translate. I replace them with one plain sentence.
- Long sentences. A sentence that reads fine can leave a synthetic voice out of breath. Shorter is better.
Step 3: Generate the audio in Speech Note
I open Speech Note, paste in my script, pick a Kokoro voice, and let the app generate the file. Everything happens right here on my laptop, which means I never send my text to any third party. For longer posts, I find it easier to split the job into two or three parts rather than trying to do it all at once. If I make a mistake near the end of a long run, fixing just that segment is way less painful than redoing the whole thing from scratch.
Step 4: Listen to all of it, then fix the odd spots
I always listen to the entire file at least once before moving on. Synthetic voices often stumble over specific names, tool brands, and acronyms. When something sounds off, I don’t try to force the voice to do a better job. Instead, I change the spelling in my script until it sounds right, then regenerate just that section.
Step 5: Upload to RSS.com and embed the player
Once the file is ready, I upload it to RSS.com, add a title and description, and copy the embed code. Then I paste that code at the very top of my WordPress post so the player is the first thing readers see. Since RSS.com creates a podcast feed, the same episode can also show up in podcast apps if I choose to publish it there as well.
Step 6: Add the AI disclosure
I make sure to state clearly that the audio is AI-narrated, both at the start of the file itself and inside the episode description. We’ll talk more about that later on.
Kokoro or Piper: which voice should you pick?
Both options are free and both work offline inside Speech Note, so the choice really comes down to your specific needs.
| Kokoro | Piper | |
|---|---|---|
| Sound | More natural and expressive | Clear but more plain |
| Speed | Slower to generate | Lighter and faster |
| Licence | Apache 2.0 | MIT |
| Best for | Finished posts you will publish | Quick checks and long drafts |
My approach is pretty simple. I use Kokoro for the version people will actually hear. If I just want to check how a script flows, or if I’m running on a slower machine, Piper is much quicker. Both licences allow publishing, which is the part I care about most.
What does it cost?
The software itself is free. Speech Note, Kokoro, and Piper are all open source projects, so there are no per-minute fees and no word limits to worry about. Hosting costs me nothing either, because I use the free plan on RSS.com. If you would rather skip a podcast host entirely, you can upload the file directly to your own WordPress media library and use the built-in audio player, although you will then lose the podcast feed.
The other cost is time. Once it becomes a habit, the whole process takes me around twenty minutes per post.
Be honest that it’s AI
I always say the audio is AI-narrated. There’s a short line at the start of the audio file and another one in the episode description. It’s simply the right thing to do. Plus, some podcast platforms actually require this disclosure if you want your show listed there. Readers appreciate being told upfront, and nobody feels tricked by it.
Mistakes to avoid
- Pasting the raw post straight into the voice engine. Links, code, and tables will all come out as nonsense. Always make a listening version first.
- Skipping the listen-through. Names and acronyms are where voices tend to slip up, and you only catch those errors by actually listening.
- Letting the AI add to the script. If the audio says things that aren’t in your post, readers who switch between the two versions will get confused.
- Using a voice model with the wrong licence. Check the terms before you publish. Kokoro and Piper are safe choices, but not every model is.
- Forgetting the disclosure. Say it’s AI-narrated every single time.
- Treating the audio as the main version. The written post is the one that gets found on Google, so keep it as the centre of your content strategy.
What I would tell you before you start
Don’t expect the voice to sound human on every single line. It’s good, just not perfect, and long sentences are usually where it slips. Write shorter sentences and the audio will improve right away. Check every post before you publish it, and keep the written version as the main one. The audio is there to give people another way in, not to replace the post entirely.
If you publish content regularly, this is one of the cheapest upgrades you can make. The software is free, the voices are good enough for most jobs, and the only real cost is a few minutes of listening and fixing.
FAQ
Can AI convert a blog post to audio for free?
Yes. Speech Note is a free, open source app, and the Kokoro and Piper voices inside it are free to use, including for published audio. It runs offline on your own computer, so there are no fees and no usage limits.
Is it okay to publish AI-generated audio of my own posts?
Yes, provided the voice model’s licence permits it and you let listeners know the narration is AI-generated. Kokoro (under Apache 2.0) and Piper (MIT) both allow this for publishing. Just check the licence for any other voice tool you might consider using.
Do I need a podcast host like RSS.com?
No, though having one does help. A host provides an embeddable player and a podcast feed so your audio shows up in podcast apps. If you simply want a basic player on your blog, you can just upload the file to your WordPress media library instead.
How long does it take to turn a blog post into audio?
For me, it’s about twenty minutes per post. This time includes cleaning up the script, generating the audio, listening through for errors, and embedding the player. Things move much faster once you’ve done it a few times.
Why not just paste the post into the voice tool as it is?
Because a post written for reading often contains links, code, tables, and long sentences that simply don’t sound right when spoken aloud. Spending a few minutes preparing a listening version first makes the audio far better.