I wanted to ask my AI assistant simple questions like “which blog posts brought in the most visitors last week?” and “what are people searching for before they land on my site?”, and get answers straight from Google Analytics and Search Console. No exporting CSVs, no screenshots of dashboards, no copying numbers into a chat.
The way to do that is with an MCP server: a small connector that lets an AI tool like Claude talk to another app. But before any MCP server can read your analytics, it needs permission. And that’s where I hit the first surprise.
Google Analytics doesn’t have a simple API key. You can’t just copy a key from a settings page like you can with most marketing tools. Instead, you create a service account, which is a robot Google account, and give it read access to your Analytics and Search Console, just like you would invite a colleague.
In this post I’ll walk through exactly how I set it up for my own site, step by step, with screenshots. The fun part: I didn’t click through most of it myself. I asked Claude Code to do it for me in Chrome, and only stepped in to approve the important bits.
Want help connecting your marketing data to AI tools that actually do the work?
If you want help getting Google Analytics, Search Console and your other marketing data connected to an AI assistant, I am happy to talk it through.
Email me Know more about meWhat you need before you start
| You need | Why |
|---|---|
| A Google account that’s an Administrator on your GA4 account | So you can add a new user to it |
| Owner access in Google Search Console | Only owners can add users |
| A Google Cloud project (free) | The service account lives here |
| About 15 minutes | That’s it |
You don’t need a credit card. Everything here is free to use within Google’s normal limits.
Step 1: Pick a Google Cloud project
Go to console.cloud.google.com and either create a new project or use one you already have. I called mine “My Analytics Project”.
One thing I learnt the hard way: Google limits how many projects a free account can create. When Claude tried to make a fresh project for me, it hitted the limit. The fix was simple. I had an old, unused project sitting there from years ago, so we reused that instead. If you have the same problem, check your existing projects before requesting an increase.
Step 2: Turn on the APIs
An API is how one piece of software asks another for data. Google keeps them switched off by default, so you need to turn on three:
- Google Analytics Data API: reads your reports (visitors, sessions, pages, sources)
- Google Analytics Admin API: lists your accounts and properties
- Google Search Console API: reads your search clicks, impressions and queries
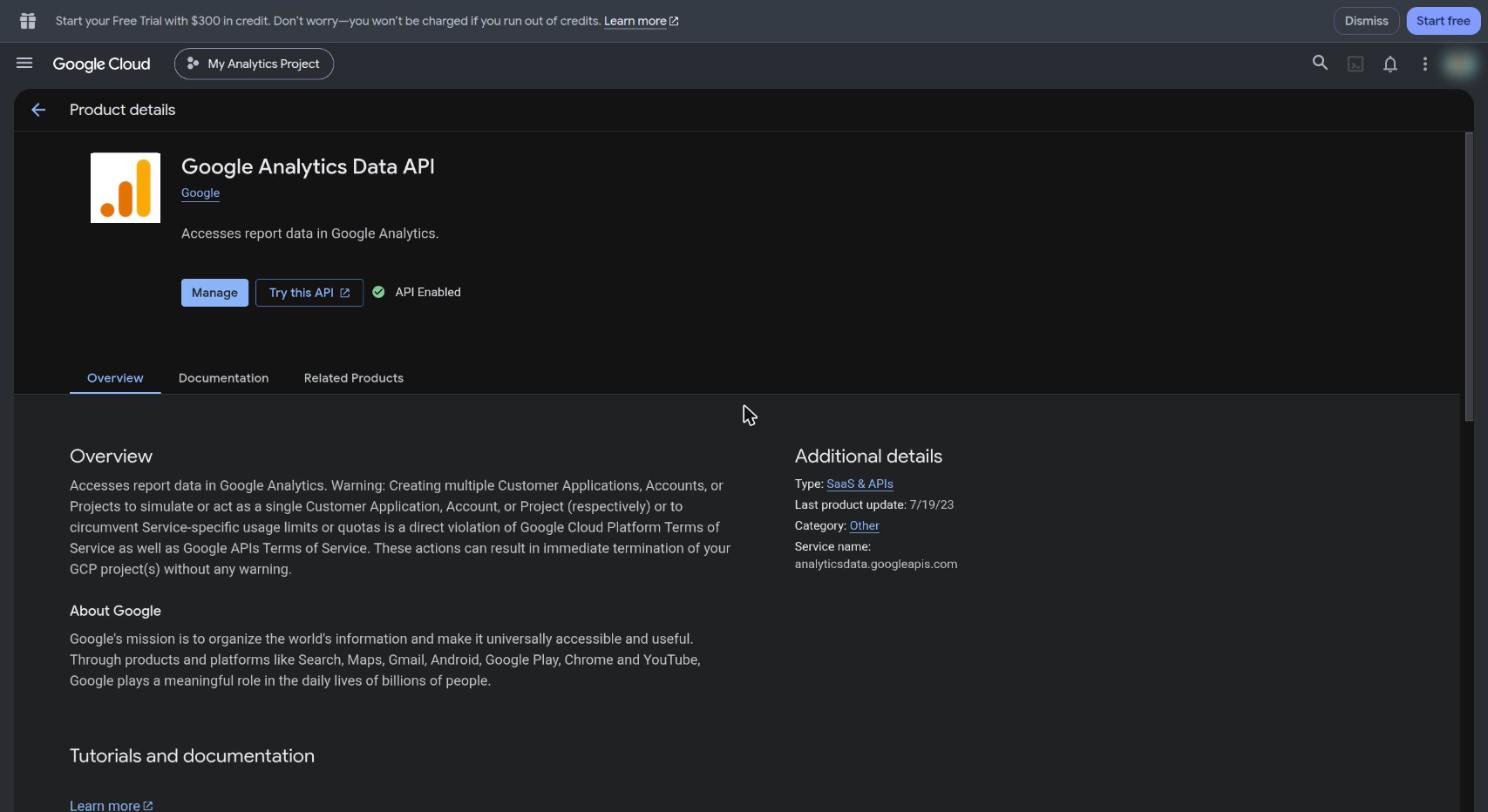
In the Cloud console, go to APIs & Services → Library, search for each one and click Enable. When it’s on, you’ll see a green “API Enabled” tick.
Step 3: Create a service account
Now create the robot user. Go to IAM & Admin → Service Accounts → Create service account.
- Name: something you’ll recognise later, like
ga-mcp - Description: “Read-only Google Analytics access for my AI MCP server”
Google gives it an email address that looks like this:
[email protected]Keep this emial handy. It’s what you’ll invite into Analytics and Search Console.
On the next two screens (“Permissions” and “Principals with access”), you don’t need to add anything. Access to your analytics data is given inside Google Analytics and Search Console, not in Google Cloud. Just click Done.
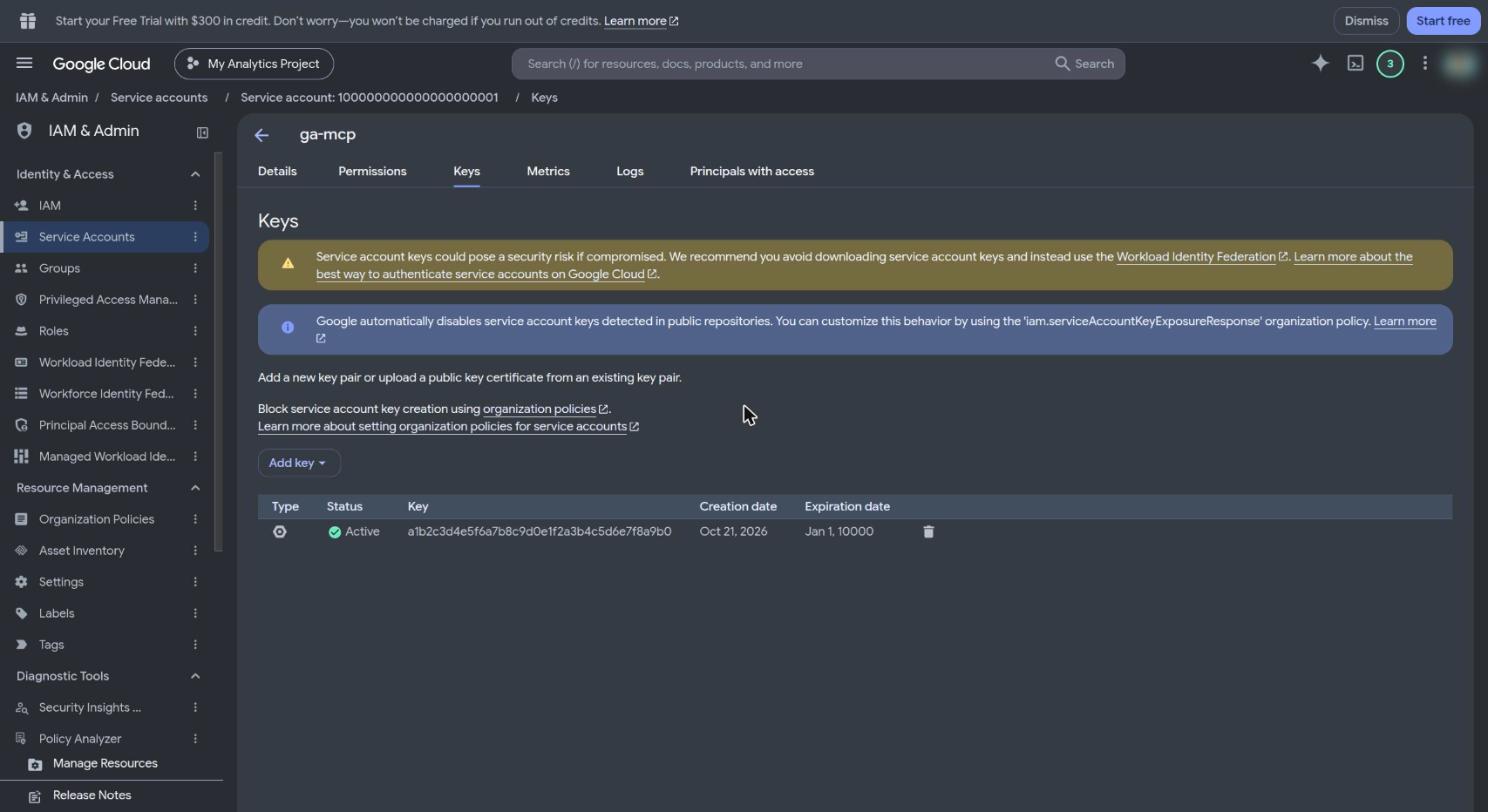
Step 4: Create a JSON key (this is your “API key”)
This is the closest thing Google Analytics has to an API key. Open your new service account, go to the Keys tab, click Add key → Create new key, choose JSON, and click Create.
A small file downloads to your computer. It looks something like this (shortened):
{
  "type": "service_account",
  "project_id": "my-analytics-project",
  "private_key_id": "a1b2c3d4e5f6...",
  "private_key": "-----BEGIN PRIVATE KEY-----\n...\n-----END PRIVATE KEY-----\n",
  "client_email": "[email protected]"
}
Treat this file like a pasword. Anyone who has it can read your analytics. I moved mine out of my Downloads folder into a private folder that only my user account can open, and I never put it in a shared folder or upload it to GitHub. Google even scans public code for leaked keys and switches them off automatically.
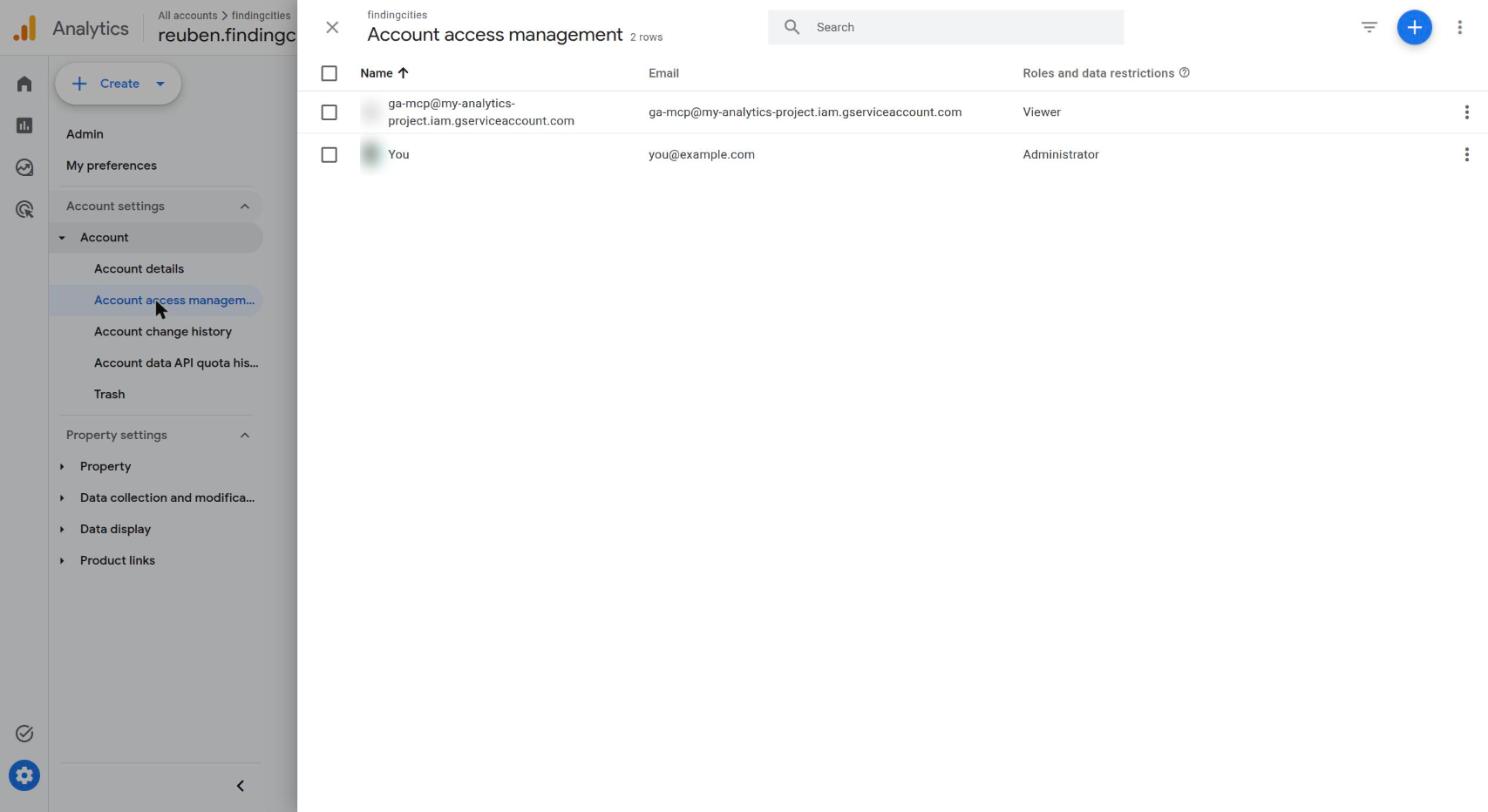
Step 5: Give it access to Google Analytics
Now invite the service account into Google Analytics, exactly like inviting a team member.
- Open Google Analytics and click Admin (the gear icon, bottom left)
- Under Account settings, click Account access management
- Click the blue + button, then Add users
- Paste the service account email
- Untick “Notify new users by email” (a robot doesn’t have an inbox)
- Choose the Viewer role. It can read reports but can’t change anything
- Click Add
Adding it at account level means it can see every property in that account. If you only want it to see one website, add it under Property access management instead.
Viewer is all an AI reporting tool neeeds. I’d always start with the lowest access level and only raise it if something genuinely needs more.
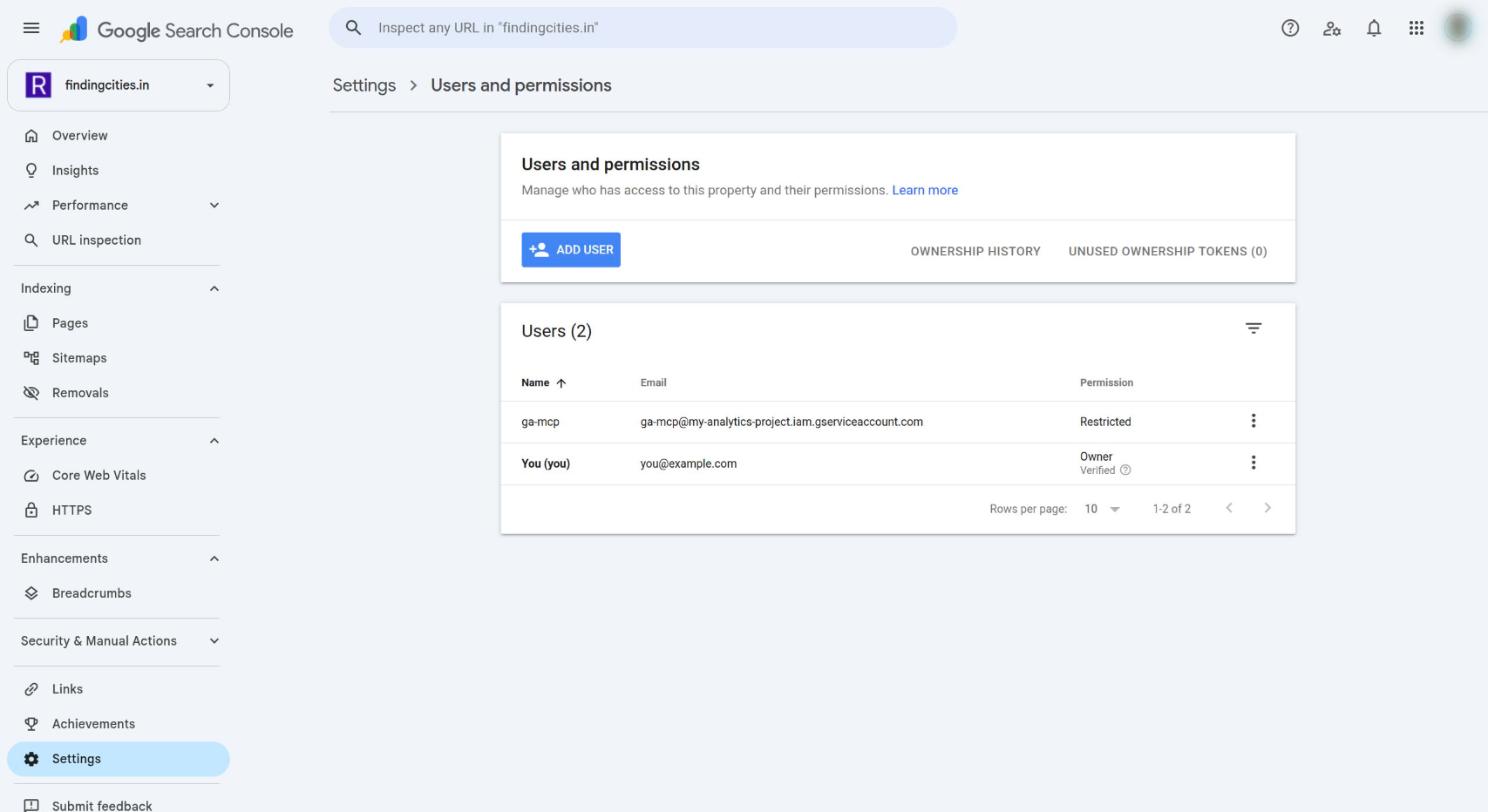
Step 6: Give it access to Google Search Console
Search Console has its own user list, so repeat the invite there:
- Open Google Search Console and pick your property
- Go to Settings → Users and permissions
- Click Add user and paste the same service account email
- Set the permission to Restricted (read-only)
- Click Add
A handy tip: if you have a Domain property (shown as “Domain property” in the list, for example findingcities.in), adding the service account there covers every subdomain too. For me that meant one invite gave access to my main site and my blog together.
Restricted lets it read performance data, indexing and URL inspection results. Full would also let it submit sitemaps and request removals. For reporting, Restricted is plenty.
Step 7: Test that it works
Before connecting any AI tool, it’s worth checking that the key actually works. Here’s a short Python test that lists the properties the service account can see and pulls last week’s visitors for one of them:
from google.oauth2 import service_account
from google.auth.transport.requests import AuthorizedSession

creds = service_account.Credentials.from_service_account_file(
    "service-account.json",
    scopes=["https://www.googleapis.com/auth/analytics.readonly"],
)
session = AuthorizedSession(creds)

# List the GA4 properties this service account can see
summaries = session.get(
    "https://analyticsadmin.googleapis.com/v1beta/accountSummaries"
).json()
for account in summaries.get("accountSummaries", []):
    for prop in account.get("propertySummaries", []):
        print(account["displayName"], "|", prop["displayName"], "|", prop["property"])

# Active users and sessions for the last 7 days
report = session.post(
    "https://analyticsdata.googleapis.com/v1beta/properties/123456789:runReport",
    json={
        "dateRanges": [{"startDate": "7daysAgo", "endDate": "today"}],
        "metrics": [{"name": "activeUsers"}, {"name": "sessions"}],
    },
).json()
print(report["rows"][0]["metricValues"])
Sample output:
findingcities | findingcities.in - GA4 | properties/123456789
[{'value': '127'}, {'value': '137'}]
And the same idea for Search Console (using the webmasters.readonly scope):
from urllib.parse import quote

site = quote("sc-domain:findingcities.in", safe="")
data = session.post(
    f"https://searchconsole.googleapis.com/webmasters/v3/sites/{site}/searchAnalytics/query",
    json={"startDate": "2026-09-20", "endDate": "2026-10-19"},
).json()
print(data["rows"][0])  # {'clicks': 12, 'impressions': 1154, 'ctr': ..., 'position': ...}
If you see your property names and some numbers, everything is connected. If you get a 403 error, the most common cause is that the service account hasn’t been added in Analytics or Search Console yet, or the API from Step 2 isn’t enabled.
Step 8: Connect it to an MCP server
Now the AI side. Google publishes an official Google Analytics MCP server, and it reads the same JSON key you created in Step 4. You point it at the key file with an environment variable, then add it to your AI tool’s MCP settings. The server is read-only, so it can run reports and inspect your property but can’t change any settings.
There are two official places to get the setup instructions, and they differ in one small detail. I’ll show both.
What I used: the official GitHub repo
I followed the readme in the official google-analytics-mcp repository on GitHub. For Claude Code, it gives this command:
claude mcp add analytics-mcp \
  --scope user \
  -e "GOOGLE_APPLICATION_CREDENTIALS=/path/to/service-account.json" \
  -e "GOOGLE_PROJECT_ID=my-analytics-project" \
  -- pipx run analytics-mcp
The repo also shows the same setup as a JSON config, for tools that use a settings file instead of a command:
{
  "mcpServers": {
    "analytics-mcp": {
      "command": "pipx",
      "args": ["run", "analytics-mcp"],
      "env": {
        "GOOGLE_APPLICATION_CREDENTIALS": "/path/to/service-account.json",
        "GOOGLE_PROJECT_ID": "my-analytics-project"
      }
    }
  }
}
One thing to know: the readme’s own text says it recommends a variable called GOOGLE_CLOUD_PROJECT for the project, even though its examples use GOOGLE_PROJECT_ID. That is the difference between the two sources.
What Google recommends: the developer docs
Google’s own page, Try the Google Analytics MCP server on Google for Developers, uses GOOGLE_CLOUD_PROJECT throughout. Here is its Claude Code command:
claude mcp add analytics-mcp \
  --scope user \
  -e GOOGLE_APPLICATION_CREDENTIALS="/path/to/service-account.json" \
  -e GOOGLE_CLOUD_PROJECT="my-analytics-project" \
  -- pipx run analytics-mcp
If you prefer uv to pipx, the same page shows a uvx version of the config:
{
  "mcpServers": {
    "google-analytics-mcp": {
      "command": "uvx",
      "args": ["--from", "analytics-mcp", "google-analytics-mcp"],
      "env": {
        "GOOGLE_APPLICATION_CREDENTIALS": "/path/to/service-account.json",
        "GOOGLE_CLOUD_PROJECT": "my-analytics-project"
      }
    }
  }
}
Which one should you use?
Both start the same server, and the package is the same one, analytics-mcp. The only difference is the name of the project variable. Google’s docs use GOOGLE_CLOUD_PROJECT, and its troubleshooting section names that variable as the quota project the APIs are called under. So if you are setting this up fresh, I’d use Google’s name. If you copy the GitHub version and hit a 403 ACCESS_NOT_CONFIGURED error, switching the variable name is the first thing to try.
Two tips from Google’s troubleshooting section that are worth knowing:
- Use the full path to your key file. Don’t use
~or$HOME, because many AI tools don’t expand them inside a config file. - If the server won’t start, the tool may not be finding
pipxoruvx. Swap the command for its full path, which you can get by typingwhich pipxin the terminal.
For Search Console there isn’t an official Google MCP server, so I’m building a small one that uses the same key. That’s a post for another day.
Once it’s connected, you can ask things like:
- “Which pages got the most visitors from organic search last month?”
- “Compare this week’s traffic sources with last week.”
- “Which search queries have lots of impressions but very few clicks?”
That last one is gold for SEO. It shows you where you’re already showing up on Google but your title or description isn’t convincing people to click.
How I let AI do the clicking
I didn’t do most of this by hand. I used Claude Code with the Claude in Chrome extension, which lets it open tabs and click through websites in my own browser, where I’m already signed in.
I asked it to set up access so an MCP server could read my analytics. It:
- checked which Google Analytics accounts I had
- found my project limit problem and suggested reusing an old project
- enabled the three APIs
- created the service account
- added it as a Viewer in Analytics and Restricted in Search Console
- ran the Python test above to prove it worked
A few things it asked me about before doing them, which I really liked:
- Which accounts to give access to. I look after analytics for a few clients too, and I only wanted my own sites included.
- Downloading the key file. It told me the file name and where it would go, and waited for my yes.
- Where to store the key. It moved it into a private folder rather than leaving it in Downloads.
That’s the right balance for me. The AI does the repetitive clicking, and I stay in control of anything involving access and security. If you’re new to tools like this, I wrote about why non-developers should use Claude Code. I also explain how I run a local setup in my post on agentic AI for marketing, and how I plan posts like this one in Nextcloud Deck.
Mistakes to avoid
- Looking for an “API key” button in Google Analytics. It isn’t there. A service account plus a JSON key is the way.
- Giving more access than needed. Viewer in Analytics and Restricted in Search Console are enough for reporting.
- Leaving “Notify new users by email” ticked. Harmless, but it sends an email to an address nobody reads.
- Forgetting Search Console. It has its own users list, separate from Analytics.
- Sharing the JSON key. Don’t email it, don’t put it in a shared drive, and don’t commit it to GitHub.
- Adding the service account to the wrong account. If you manage clients’ analytics, double-check which account you’re in before you click Add.
FAQ
Does Google Analytics have an API key?
Not in the usual sense. Google Analytics 4 uses a service account with a JSON key file instead of a simple API key. You create the service account in Google Cloud, download its JSON key, and add its email address as a user in Google Analytics.
Is it safe to give an AI tool access to Google Analytics?
It’s as safe as the access you give it. With the Viewer role, the service account can only read reports. It can’t change settings, delete data or add users. Keep the JSON key private, and you can remove the user from Google Analytics at any time to cut off access.
Can I use the same service account for Google Analytics and Search Console?
Yes. One service account and one JSON key can read both, as long as you enable both APIs and add the service account as a user in each tool.
Is the Search Console API free?
Yes. The Search Console API and the Google Analytics Data API are free to use, within Google’s daily usage limits, which are more than enough for normal reporting.